Popular Posts

Thursday, January 13, 2011

Automatic system Recovery (ASR)


Sometimes Your Heard Disk Drive might run in bed condition and want to format it. At that time you can recover Windows 2000 and Xp using Automatic system recover console. We can format the system drives and recover the existing data in previous mode.

STEPS

  1. Start >> program>> Accessories>>System Tools>>Backup. Then Welcome to Backup and restore Wizard dialog box appears.2. Click and advance mood option. Then Backup unity dialog box appears. 3. Then click on automated system recovery wizard. Then Automated system recovery preparation Wizard dialog box appears. 4.Click on Next.

5.Choose the appropriate location for your backup like d: or e: It gives backup.bkf file name by default.

6.Click on Next to start whole system backing up. It takes some time for the process.

7.Lastly computer asks you to inset formatted disk in floppy drive to create ASR file.

8.Then insert format floppy disk in floppy drive and take it out and keep in safe place Whine finished.

  1. Now doot your pc inserting windows” Xp cd.

  1. Choose F2 for automatic system recover.

  1. Insert your ASR Floppy disk and press Enter key.

  1. Then computer start Formatting process directly without asking any option. At that time computer automatically re setups all system files.

  1. Choose the pre backup file name.

  1. Then computer Restores backup files in the original location.

CONECTING FAT 32 TO NTFS (WITHOUT FORMATING)

  1. Click on start button.
  2. Click on run.
  3. Type command or cmd in Open box.
  4. Click on Ok.
  5. C:/FS:NTFS and then press Enter Key.
  6. Enter vol name(if needed)

Wednesday, January 12, 2011

Hacked by Godzilla- Virus Fixed

Hacked by Godzilla is a new computer virus that widely infect from using Handy Drive of Floppy Drive.

Defaced

1. We can not Double click to open any drive on your computer. But we can right click to open or explore.

2. There is a text “Hacked by Godzilla” on title bar of internet explorer.

How to fixed Godzilla

1. Double click on my computer icon on desktop and select Tools --> Option.

2. When Folder Option click at View tab.

i. click at Show Hidden files and folders

ii. uncheck the hide extention…. And Hide protected operating system file.

iii. click Ok.

3. Press ctrl+Alt=Detect. The Windows Task Manager will display. Click at processes tab.

i. Click menu Image Name ( to sort files )

ii. Select Wscript.exe (one by one )

iii. Click ead process button

4.Open drive (By right click and select Explore. Must not Double Click !) Delete auto run.inf and Ms32DLL.dll.vbs (Press Shift+Delete) in all Drives include Handy Drive and Floppy disk.

5. Open folder c:\Windows to delete Ms32DLL.dll.vbs inside(press Shift +Delete)

6. Go to Start--> Run and enter regedit click Ok. Registry Edit dialog will display.

Select HKEY_LOCAL_MACHINE--> Software--> Microsoft --> Windows --> current Version--> Run to delete MSS32DLL (press Delect Key on keyboard)

8. Select HKEY_CURRENT_USER--> softwere--> Microsoft--> Internet Explorer--> Main to delete Windows title Hacked by Godzilla (press Delete key on keyboard)

9. Click Start --> Run and enter gpedit.msc click Ok. Group Policy dialog will display.

10. Select User configuration --> Administrative Templates --> System--> Double click on file Turned Off Auto play then Turn off Auto play Properties Will Display

i. Select Enabled

ii. select All drives

iii. Click Ok

11. Click Start--> run and enter msconfig click Ok. The system configuration utility Dialog will Display.

i. Click startup tab.

ii. Uncheck MS32DLL.

iii. Click Apply.

iv. Click Ok.

When the system configuration dialog display select Exit with restart.

12. Double click on icon My computer on My computer on desktop. Then select Tools-->

Folder.

13. On Folder option dialog select view tab.

i. Click at Hide extension.. and Hide protected operating system file.

ii. Click Ok.

14. Right click at Recycle Bin. Then select Empty Recycle Bin to make sure the virus is

deleted.

Friday, December 10, 2010

Changing Desktop

.

Changing Desktop (Background / Wallpaper):

Wallpaper is the background area of the Desktop. Any Pattern of picture that can be stored as a bitmap (.bmp) or, in .jpg /.jpeg/gif etc…. files can be set as a screen back ground.

  1. Click the right mouse Button anywhere inside the blank area of the Desktop.
  2. Click on properties.

Or

  1. Click on start button.
  2. Choose setting.
  3. Click on control panel.
  4. Then, give double click on Display icon.

Then Display properties dialog box with different folders will appears.

  1. Choose Background folder –in case of windows ’00 and choose Desktop folder –in case of Windows’XP (if other folder exit) from properties dialog box.

6. Click on up or down arrow of Background and choose required wallpaper by viewing its sample.

7. Also choose required Display type (Tile/Center/Stretch).

8. Click on Apply.

9. Click on OK.

NOTE ( You can also select the required image(picture) as Wallpaper by clicking on browse button and choosing required one.

Tuesday, November 2, 2010

Change Screen Saver


Change Screen Saver

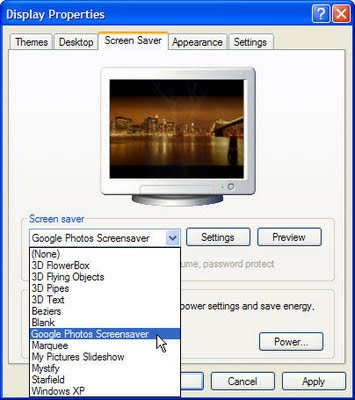
  1. Choose screen saver folder from display properties dialog box.
  2. Click on dropdown arrow of screen saver and choose required one.
  3. Click on setting button to set the special effect to the selected screen saver.
  4. Also define required waiting time for screen saver.
  5. Click on preview button to view its sample.
  6. Click on Apply.
  7. Click on OK

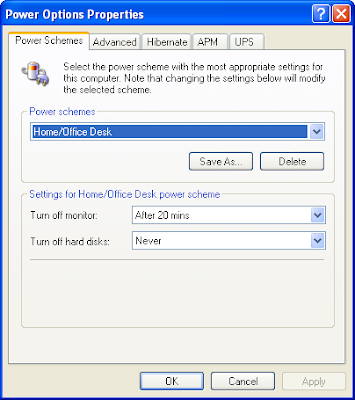
Note1. You can also define the required setting for standby, turn off monitor and Turn off Hard disk by using the settings (power) button of Energy saving features of Monitor.


Note2. Put the tick mark on (Ron resume, password protected ) option in windows’XP to lock the computer with screen saver.


Changing Appearance Of The Screen


Changing Appearance Of The Screen


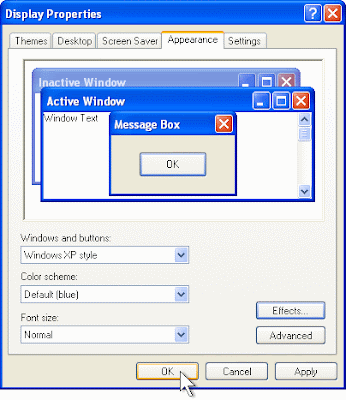
This option used to change the appearance (color, Front and size) of any viewable items inside the computer screen.


  1. Choose Appearance folder from display proprieties dialog box.

  2. Click on dropdown arrow of scheme (color scheme) and choose required one by viewing it’s sample. It helps to change overall screen color.

  3. But, if you want to change the color, front and front size of individual items then direct click on dropdown arrow of items ( Windows’00) and choose required item. But, in case of windows’XP, first click on advance button.

  4. After then, choose required items and click on dropdown arrow of color, front and front size and then required one.

  5. Click on OK.

  6. Click on apply.

  7. Click on OK.

(NOTE: To change into it’s default (standard ) setting, click on dropdown arrow of scheme (color scheme) and choose Windows Standard (Windows Classic).


Display Changing Setting


Changing Setting


With the help this option, you can change the different color level of the system and also set less or moor screen area (Screen Resolution).


1. Choose setting folder from Display properties dialog box.


2. Click on down arrow of color and choose required color (256 color, 16 bit, 32 bit etc).


3. In case of Desktop area, click on moving arrow and drag it up to less or moor position as your requirement.


(NOTE: 800 by 600 pixels is the standard resolution value for all types of computer program,


4. Click on apply.


5. Click on OK.


6. Click on yes.


7. Again, click on OK.